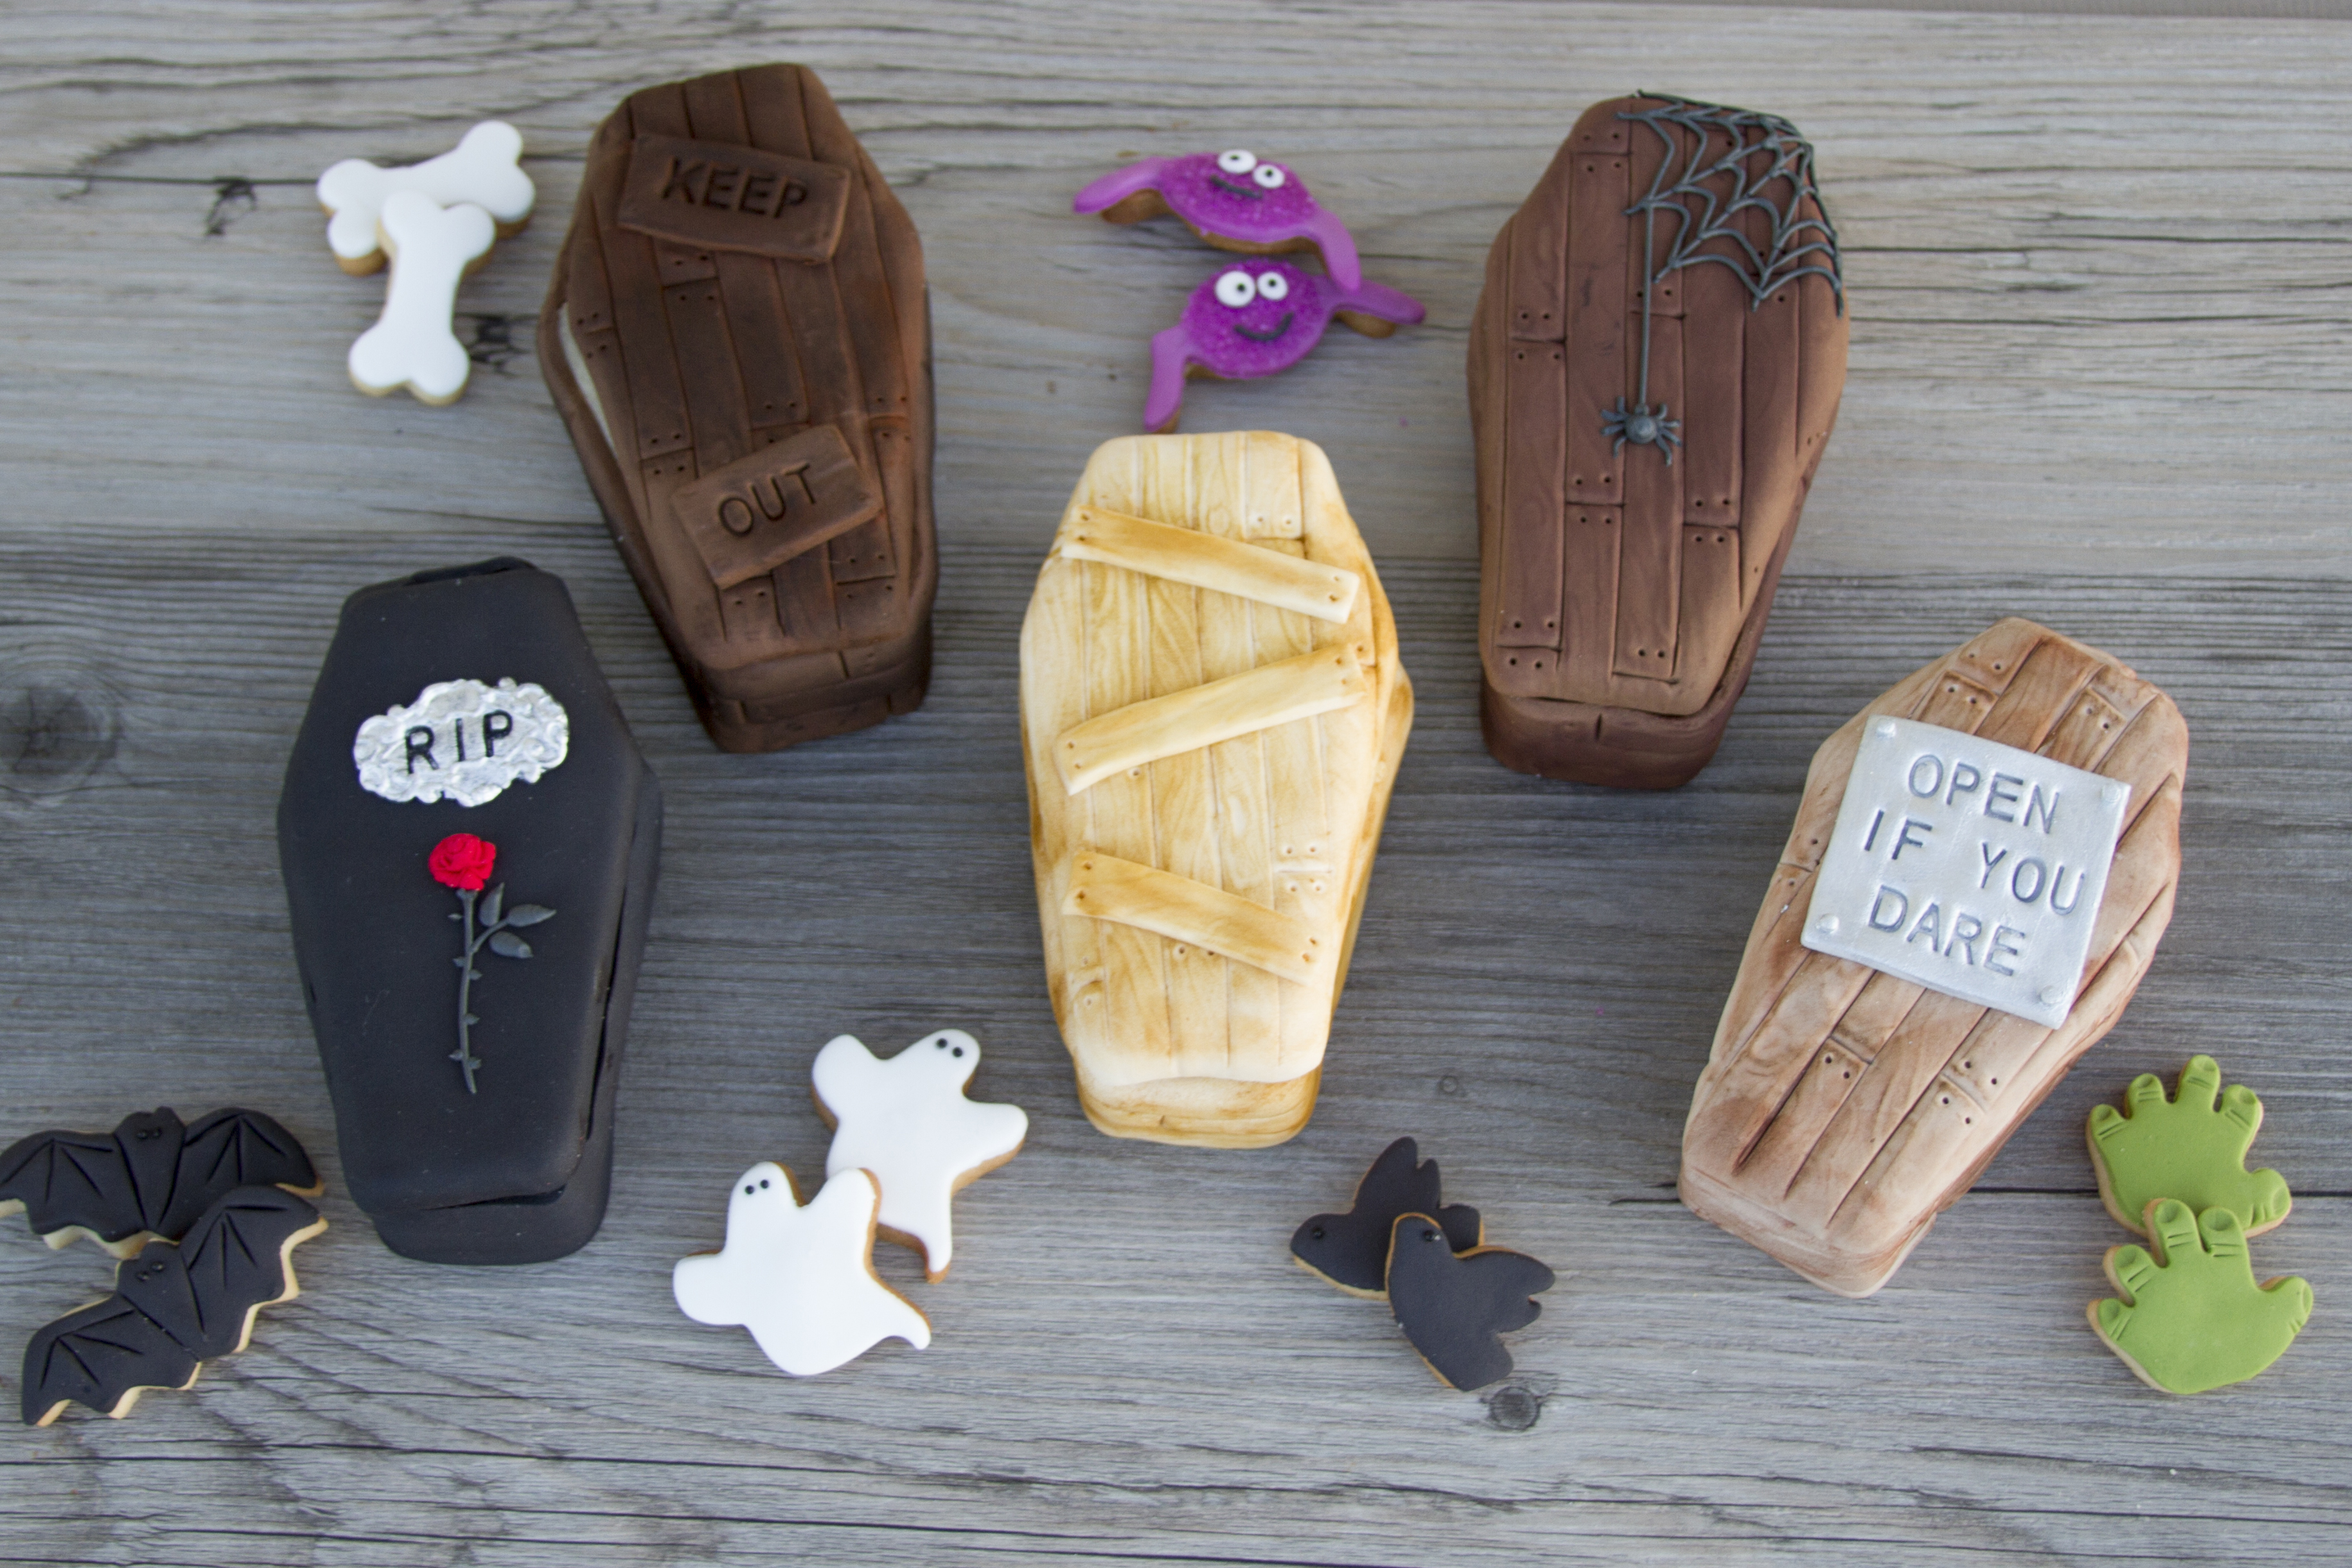
Tag Archive | halloween cookies

3-D Coffin Cookies filled with mini Halloween Cookies

IMG_7990

IMG_7998

Supplies used:

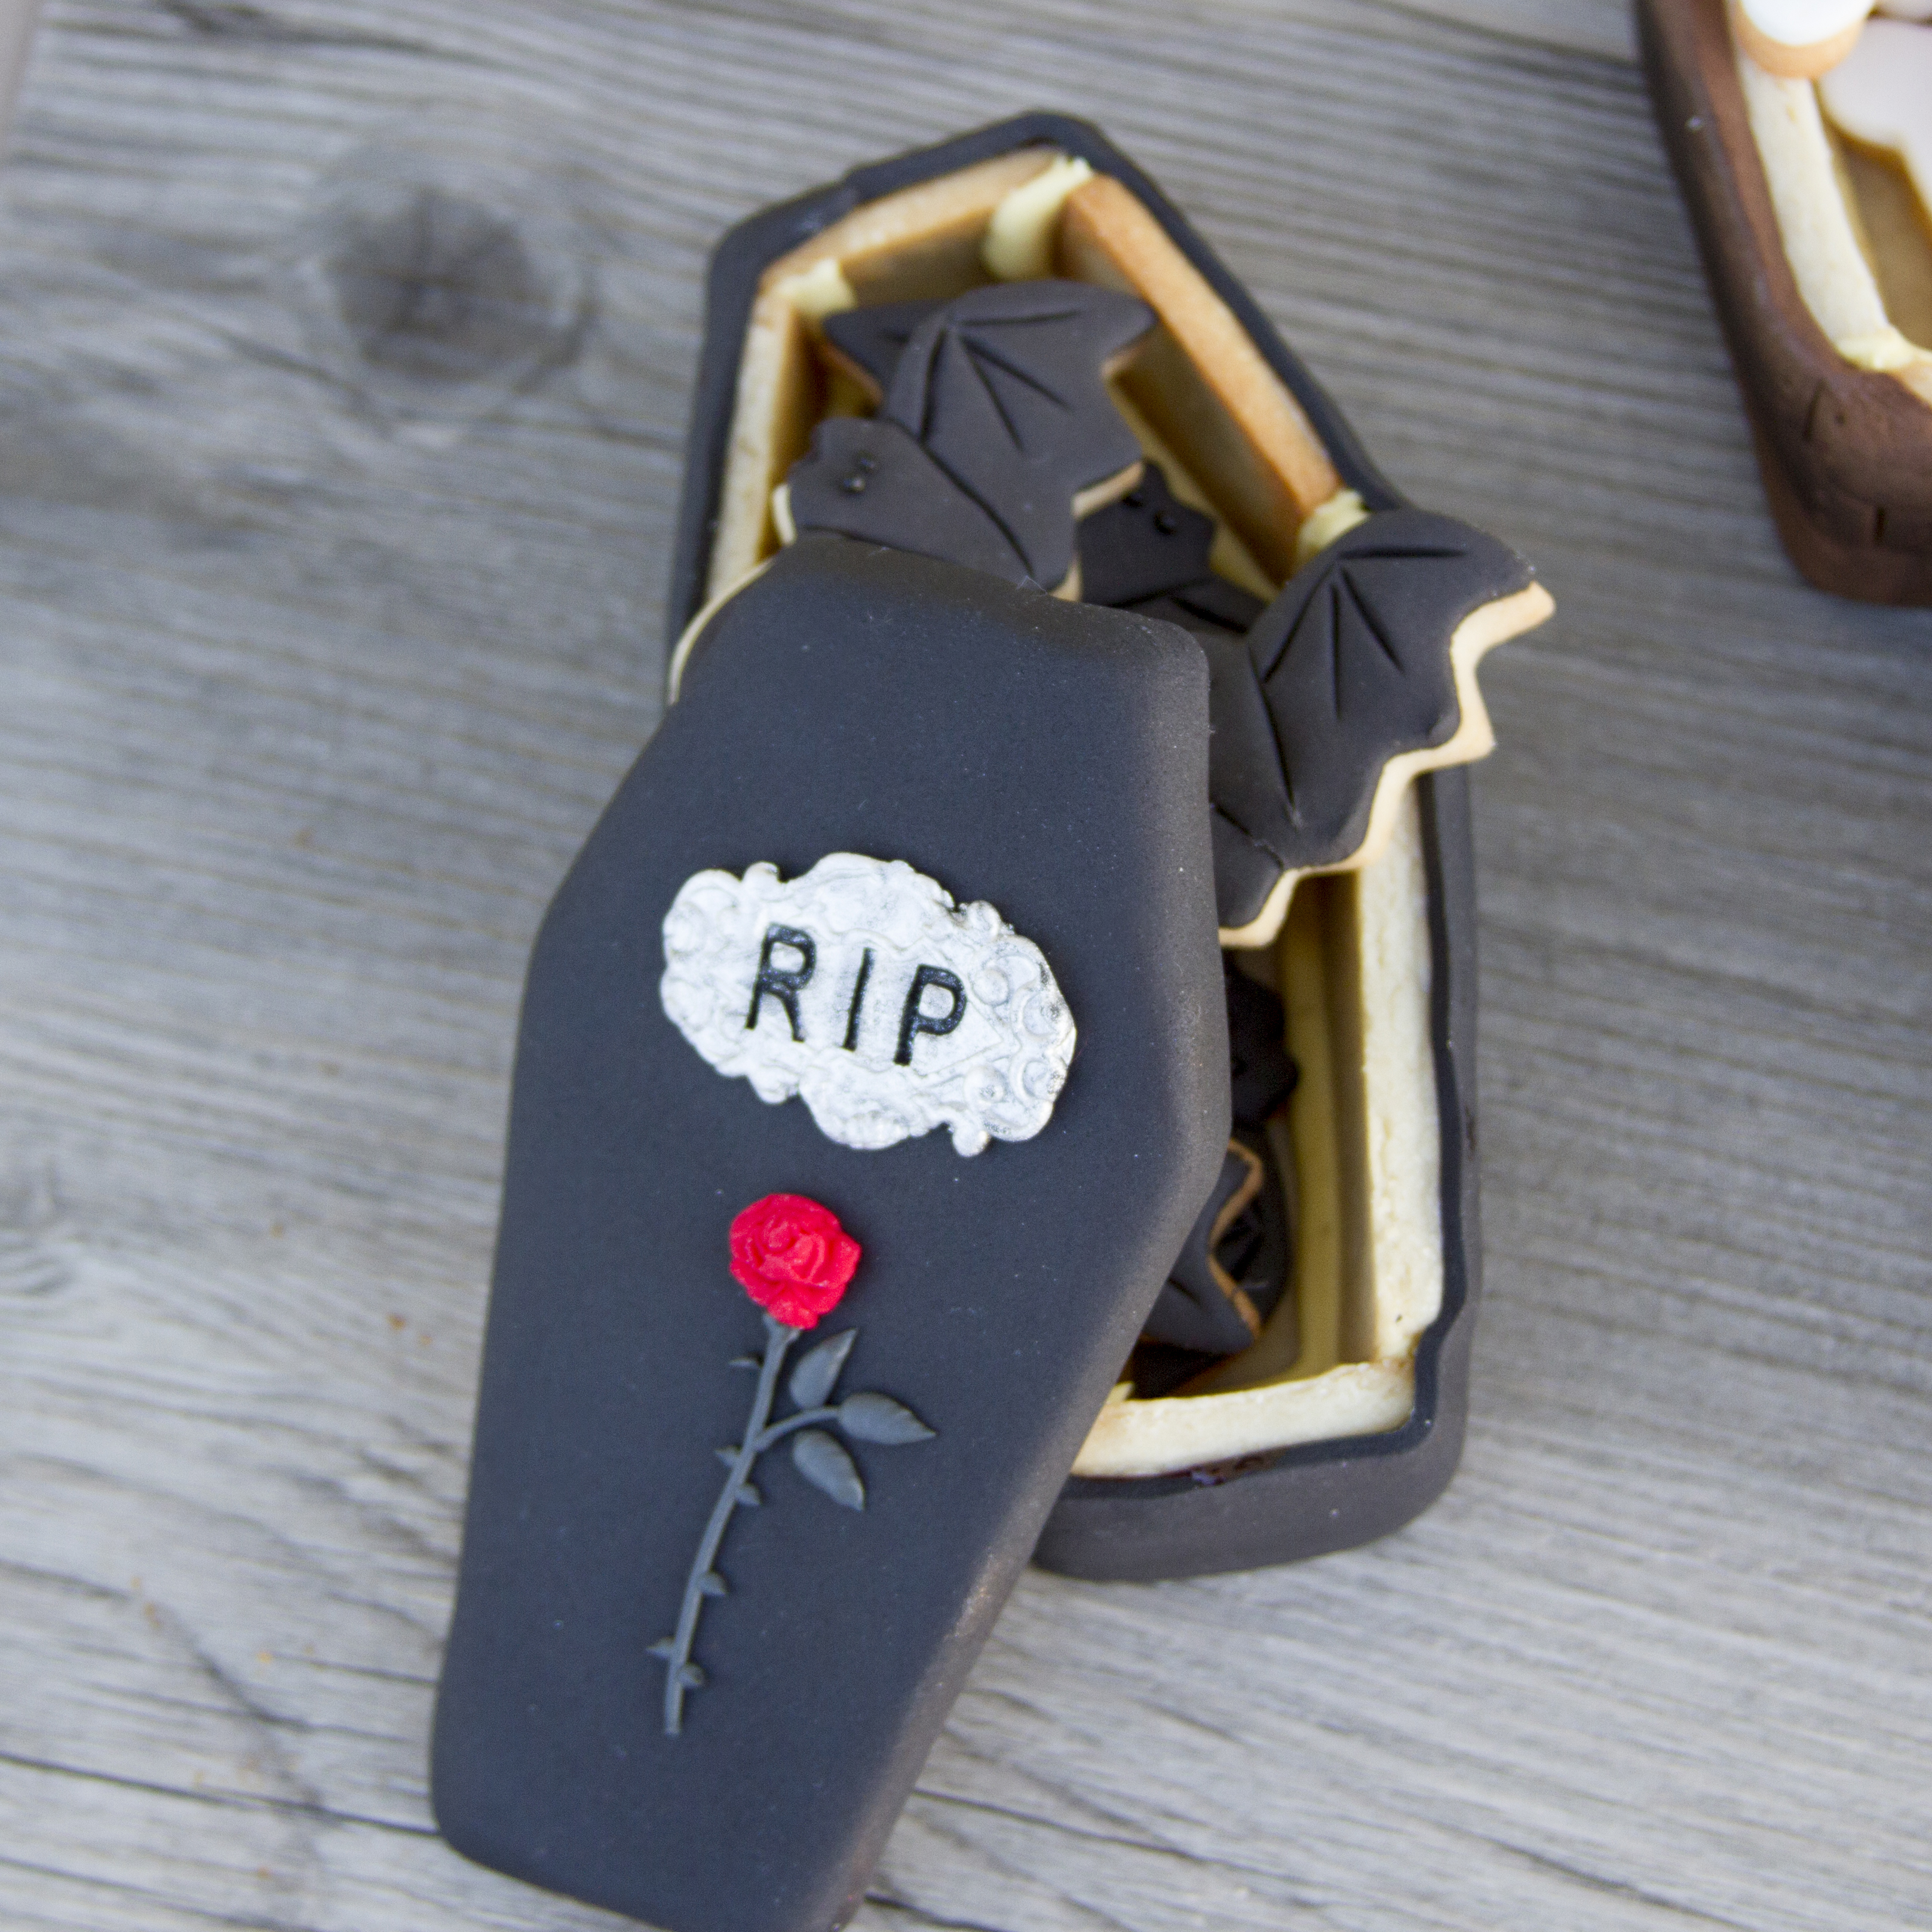
3-D coffin cookie cutter

Halloween mini cutter set
mini dog bone cutter
mini hand cutter
mini dove cutter
royal icing
black rolled fondant
brown rolled fondant
ivory rolled fondant
white rolled fondant
snap together letter embossers
chocolate brown dusting powder
deep brown dusting powder
wood grain texture mat
polyblade
two-in-one tool
brush
black non-pariels
piping gel
silver dusting powder
key silicone mold
rose mold
tip #1.5
paring knife
grain alcohol

Instructions:

Roll cookie dough. Cut the coffin cookies, using the coffin cutter. You will need two sets from the cutter. Cut the bones, ghost, hands, crows, and bats. Bake and cool the cookies. Assemble the coffins using royal icing. Allow the 3-D coffin to dry overnight. Knead and soften fondant for the coffin. Roll the fondant. Texture the fondant with the wood grain texture mat. Brush piping gel on the coffin lid. Cover the lid with the textured fondant. Use the polyblade to trim around the fondant-covered coffin lid. Roll a strip of fondant. Texture with the wood grain texture mat. Cut the strip the height of the sides of the coffin cookie. Brush piping gel around the side of the cookie. Place the strip around the side of the coffin. Add additional dimension on the coffin lid and the side of the coffin using the polyblade to add deeper cuts. Add nail holes using the two in one tool. Cut small pieces to resemble wood pieces. Emboss “Keep Out” on the wood pieces using the letter embossers. Cut a small square of grey fondant and emboss “Open if you dare” using the letter embossers. Paint the square with silver dust mixed with grain alcohol. Mold the top part of the key using black fondant. Paint the key plaque with silver dust mixed with grain alcohol. Emboss “RIP” on the key plaque using the letter embossers. Mold the rose and attach using piping gel. Attach the coffin lid accents using piping gel. Pipe the stem using royal icing and tip #1.5. Pipe a spider web using black royal icing and tip #1.5.

Cover the mini cookies with rolled fondant. Emboss the hands using the two in one tool. Emboss the bat using a paring knife. Use non-pariels for the eyes on the bat, ghost, and crow, attaching with piping gel.

IMG_8002

IMG_8003

IMG_7999

IMG_8000

Cutie Halloween Cookies

Cutie Halloween Cookies

Cutie Halloween Cookies


Supplies used:

Autumn Carpenter’s Halloween Cutie Cupcake Cutter Set
Autumn Carpenter’s Mini Accent Cutter Set
perfection strips
purple rolled fondant
white rolled fondant
lime green rolled fondant
orange rolled fondant
black rolled fondant
brown rolled fondant
piping gel
sharp paring knife
black royal icing
tip #1
parchment bags
pastry brush
round cookie cutter

Instructions:

Roll purple and lime green fondant thin using black perfection strips. Cut circles to fit cookies and attach to cookie using piping gel. Use large circle accent cutter to cut pieces out of each cookie, replacing purple circles with the green ones.

Bat: Roll black, white and orange fondant very thin. Cut out bats. Use the two smallest round accent cutters to cut the eyes from white fondant. Use paring knife to cut small triangles for the teeth and to draw a mouth. Attach all pieces to bat using piping gel. Using the smallest circle accent cutter, cut the dots for the bats stomach and attach with piping gel. Attach bat to center of cookie. Roll tiny pieces of black fondant into balls for the eyeballs and attach with piping gel.

Pumpkin: Roll orange, brown, white and green fondant very thin. Cut pumpkins from orange fondant. Cut pumpkins from brown fondant then cut the stem of the pumpkin off and attach to orange pumpkin with piping gel. Use the mini accent cutter shaped like a football to cut green leaves to attach to stem. Cut eyes using the two smallest round accent cutters and cut the mouth using an oval shaped cutter out of the white fondant; attach all pieces with piping gel. Attach pumpkin to center of cookie. Roll tiny pieces of black fondant into balls for the eyeballs and attach with piping gel.

Skull: Roll white and black fondant very thin. Cut skull from white fondant and attach to center of cookie using piping gel. Use the two larger circle accent cutters to cut the eyes from black fondant; attach to skull with piping gel. Roll tiny pieces of green fondant into balls for the eyeballs and attach with piping gel. Use black royal icing to pipe the nose and mouth.

Sparkly Halloween Cookies

LSAC-S3C30-024Supplies used:
bat cookie cutter
skull cookie cutter
witch hat cookie cutter
electric green food color
black food color
regal purple food color
orange food color
black disco dust
lilac disco dust
sour apple disco dust
burnt orange disco dust
tip #1.5
Icing required: Prepare run sugar icing in the following colors: white, black, purple, green, and orange.

Instructions:
Skull Cookies: Outline and fill the skull with white run sugar. Allow to set completely. Outline and fill in the eyes with black run sugar. Immediately sprinkle with black disco dust. Pipe nose and mouth with black royal icing using tip #1.5. Immediately sprinkle with black disco dust.
Bat Cookies: Outline and fill the bat wings with black run sugar..Allow to set completely. Outline and fill in the body with purple run sugar. Allow to set completely. Brush piping gel on the bat’s body. Immediately sprinkle with purple disco dust. Outline the bat with purple run sugar. Immediately sprinkle with purple disco dust. Pipe the eyes and mouth with white royal icing using tip #1.5. Pipe dots for the eye and black royal icing.
Witch Hat Cookies: Outline and fill the band of the witch hat with orange, green, or purple run sugar icing. Allow to set completely. Outline and fill in the hat with black run sugar. Allow to set completely. Pipe hat details with run sugar icing and immediately sprinkle with the same color of disco dust.

This project was taken from my book “The Complete Photo Guide to Cookie Decorating”.

Print a copy of this project.

Stenciled Halloween Cookies

LSAC-S3C30-023Supplies used:
pumpkin cookie cutter
round cookie cutter
orange food color
black food color
orange rolled fondant
black rolled fondant
white rolled fondant
Halloween stencils
Icing required: Prepare royal icing and run sugar icing in the following colors: orange, black, and white.

Instructions:
Cover the cookies with rolled fondant. Use the jack-o-lantern stencils to add the pumpkin face designs. Use the spider and bug stencils to add the design on the round cookies. Pipe dots around the cookies using run sugar.

This project was taken from my book “The Complete Photo Guide to Cookie Decorating”.

Print a copy of this project.

Faces of Halloween Cookies

Faces of Halloween Cookies

Faces of Halloween Cookies

Supplies used:
witch head cookie cutter
cat face cookie cutter
pumpkin cookie cutter
skull cookie cutter
Frankenstein head cookie cutter
oval cookie cutter
white rolled fondant
orange rolled fondant
purple rolled fondant
black rolled fondant
lime green rolled fondant
black food color
mini circle cutters
round cake decorating tips, such as tips #6, #8, and #10
aspic cutters
mini heart cutters
tip #1
moonstone silver dust
grain alcohol
Icing required: Prepare royal icing in black.

Special Baking Instructions:
Cut 1/3 off of an oval cookie cutter. Use a paring knife to create a jagged edge for the ghost.

Instructions:
Frankenstein: Cut the face with green rolled fondant. Remove the ears. Cut out circles for the eyes using two sizes of circle cutters. Hand cut a rectangle for the hair. Cut zig-zags off the hair using a paring knife. Attach with piping gel. Cut a long angled rectangle for the eyebrow using a paring knife and black rolled fondant. Attach with piping gel. Cut an angled rectangle using orange rolled fondant and a paring knife. Attach with piping gel. Cut purple and orange rolled fondant with the same cutters used to cut the holes for the eyes. Fill in the holes. Cut black rolled fondant using smaller circle cutters than the eyes. Cut the white circles for the eyes using white rolled fondant and the small tapered end of tip #8. Attach the pieces to the eyes with piping gel. Using a paring knife, cut small rectangles of white rolled fondant for the bolts. Paint with silver dust mixed with grain alcohol. Pipe the mouth with royal icing using tip #1.
Skull: Cut the face with the same cutter used in baking with white rolled fondant. Cut out circles for the eyes using circle cutters. Cut out a heart for the nose using a heart from the aspic cutter set. Cut black rolled fondant with the same cutters used to cut the holes for the eyes. Fill in the holes. Cut white rolled fondant using smaller circle cutters than the eyes. Cut the tiny black circles for the eyes using black rolled fondant and the small tapered end of tip #8. Attach the pieces to the eyes with piping gel. Cut a heart with black rolled fondant using the same cutter to cut the hole for the nose. Pipe the mouth with black royal icing using tip #1.
Pumpkin: Cut with the same cutter used in baking with orange rolled fondant. Remove the stem. Cut out circles for the eyes using two sizes of circle cutters. Cut out the mouth using a shape from the aspic set. Cut a stem with the cutter used in baking with green rolled fondant. Attach with piping gel. Cut purple and green rolled fondant with the same cutters used to cut the holes for the eyes. Fill in the holes. Cut black rolled fondant using smaller circle cutters than the eyes. Cut the white circles for the eyes using white rolled fondant and the small tapered end of tip #6. Attach the pieces to the eyes with piping gel. Cut the mouth with the same cutter used to cut the hole for the mouth. Attach with piping gel. Pipe the mouth with black royal icing using tip #1.
Cat: Cut the face with the same cutter used in baking with black rolled fondant. Cut out circles for the eyes using two sizes of circle cutters. Cut out the mouth using a shape from the aspic set. Attach with piping gel. Cut purple and green rolled fondant with the same cutters used to cut the holes for the eyes. Fill in the holes. Cut black rolled fondant using smaller circle cutters than the eyes. Cut the white circles for the eyes using white rolled fondant and the small tapered end of tip #10. Attach the pieces to the eyes with piping gel. Cut the mouth with the same cutter used to cut the hole for the mouth. Attach with piping gel. Pipe the mouth and eyebrows with black royal icing using tip #1.
Ghost: Cut the ghost with the same cutter used in baking with white rolled fondant. Cut a jagged edge on the white rolled fondant. Cut out circles for the eyes using two sizes of circle cutters. Cut purple and green rolled fondant with the same cutters used to cut the holes for the eyes. Fill in the holes. Cut black rolled fondant using smaller circle cutters than the eyes. Cut the white circles for the eyes using white rolled fondant and the small tapered end of tip #10. Attach the pieces to the eyes with piping gel.

This project was taken from my book “The Complete Photo Guide to Cookie Decorating”.

Print a copy of this project.

Spooky Tombstone Cookies

Spooky Tombstone Cookies

  • tombstone cutter
  • white rolled fondant
  • black rolled fondant
  • 3 dark shades of petal dust (black, brown and dark green)
  • lemon oil
  • piping gel
  • black food marker

Bake and cool cookies.  Roll out white fondant and cut out using same cutter.  Attach fondant to cookie. Use a small knife or modelling tool to create lines and “cracks” in tombstones.  Roll fondant into thin rope and twist into scrolls.  Attach ropes and scrolls to tombstone with small amount of piping gel.  Hand mold bat and skull with white fondant and fingers with black fondant; attach pieces to tombstones.   Mix petal dust with lemon oil to make a thin paint.  Paint onto cookies allowing streaking and heavy and light spots.  Concentrate heavy amounts of paint around cracks and details.  Use black food marker to write R.I.P.

Vampire Cookies

Vampire Cookies


  • vampire cookie cutter set
  • run sugar icing
  • small amount of fondant
  • rose bud candy mold
  • red piping gel
  • black food color
  • red food color

Using cookie cutter set, bake cookies. Divide icing and make colors. Outline cookies in black icing then fill-in with colors desired. Add details where necessary using icing or piping gel or molded fondant.

Pumpkin in a Wheelbarrow

Pumpkin in a Wheelbarrow

  • pumpkin in wheelbarrow cutter
  • rectangle cutter
  • run sugar icing
  • brown, black, orange, green food coloring

Bake according to recipe instructions and allow to cool. Outline the entire cookie and quickly fill in. Allow icing to dry (approximately 24 hours). Use a paint tray and put a couple drops of each color in each cavity. Add a couple drops of water to create paint. Paint cookie, leaving space between different colors to prevent bleeding. Allow paint to dry and go back to cookie and use full strength food coloring to paint bright details and outlines. You can also use a food marker to draw outlines.

Spooky Halloween Cookies

Spooky Halloween Cookies


  • skull head cookie cutter
  • bird cookie cutter
  • coffin cookie cutter
  • run sugar icing
  • black food coloring
  • edible glitter dust

Bake cookies according to recipe instructions and allow to cool. Outline and fill in cookies with white or black run sugar. Allow to set completely.  Use the opposite color run sugar icing to pipe details on cookies.  Before details have hardened sprinkle with glitter dust and tap off excess.

Halloween Potion Bottles

Halloween Potion Bottles


  • cookie crafting kit
  • brown fondant
  • black food coloring
  • piping gel
  • printed edible images

Using the crafting kit, make a cutter that looks like a long necked bottle. Bake cookies. Color fondant. Using the same cutter that you did for cookies, cut out brown bottle images and black bottle caps. Attach fondant pieces to cookies with piping gel. Detail bottle cap with lines using a sharp knife. Attach edible image bottle labels using a damp brush.