Archives

Paisley Bird Cookies

Paisley Bird Cookies

Paisley Bird Cookies

Supplies used:

5″ bird cookies
assorted colors rolled fondant
paisley texture mat
paisley accessory mold
royal icing
small round piping tips
piping gel
pastry brush
flexible polyblade
rolling pin
Autumn Carpenter’s Fluttering Friends Cutie Cupcake Cutter Set
assorted food color paste or gels

Instructions:

Roll fondant thin and use same cutter used to cut cookies to cut the fondant. Brush cookie with piping gel and attach fondant piece. To make texture piece, roll fondant thin and place over texture mat. Be sure the mat is on the side to give you a raised image. Roll over fondant with even pressure. Flip fondant over and remove mat. Use cutter to cut piece and attach to cookie using piping gel. Use polyblade to remove the beak and feet. Roll orange fondant the same thickness as your bird and use cutter to cut the feet and beak. Use the polyblade to cut feet, wing (only on the paisley textured birds) and beak and replace the feet and beak on the cookie.

For plain wings, roll desired fondant color thin and use the bird cutie cutter to cut the wing. Allow wing to dry for several hours. For paisley wings, push desired fondant color into paisley mold then remove with sharp pin or modeling tool. Pipe colored accents using royal icing then allow to dry for several hours.

Use royal icing to pipe over paisley textured birds and allow to dry. Attach wings to birds using piping gel and roll tiny balls from brown fondant for the eyes and attach with piping gel.

Textured Flip Flop Cookies

Textured Flip Flop Cookies

Textured Flip Flop Cookies


Supplies used:

flip flop cookies
assorted colors of rolled fondant
Hawaiian Texture Sheet Set
piping gel
pastry brush
cotton balls
edible markers
PME strip cutter

Instructions:

Roll rolled fondant to desired thickness. Use texture mats to texture fondant and cut using same cutters used to make cookies. Brush cookies with piping gel and lay fondant on cookies. If pattern is recessed, used edible markers to highlight patterns. Cut flip flop straps using strip cutter. Attach to flip flop using piping gel. Use cotton balls to prop-up straps until dry.

Baby Elephant Cookies

Baby Elephant Cookies

Baby Elephant Cookies


Supplies used:

Autumn Carpenter’s Jungle Cutie Cupcake Cutter Set
Autumn Carpenter’s Mini Accent Cutter Set
perfection strips
3 ΒΌ” fluted square cookie cutter
lime green rolled fondant
turquoise rolled fondant
blue rolled fondant
light blue rolled fondant
black non-pareils
pastry brush
piping gel

Instructions:

Roll lime green fondant using black perfection strips. Cut fluted squares and attach to cookies brushed with piping gel.
Roll turquoise rolled fondant very thin and cut with elephant cutter. Attach to center of cookie with piping gel. Roll light blue fondant very thin, using the largest teardrop accent cutter, cut elephant ear and attach with piping gel. Place a dot of piping gel in front of the ear and push in a non-pareil for the eye.

Birthday Party Hat Cookies

Birthday Party Hat Cookies

Birthday Party Hat Cookies


Supplies used:

Autumn Carpenter’s Birthday Cutie Cupcake Cutter Set
white rolled fondant
light blue rolled fondant
dark pink rolled fondant
light pink rolled fondant
lime green rolled fondant
perfection strips
3 Β½” round cookie cutter
2 ΒΎ” fluted cookie cutter
sharp paring knife
flexible poly blade
piping gel
pastry brush
small paint brush

Instructions:

Roll light blue and white fondant using black perfection strips. Cut light blue fondant using the same cutter used to cut the cookies. Cut white fondant with fluted cutter and attach piece to cookie brushed with piping gel. Use fluted cutter to cut the center of the light blue circle and place around the edge of the white fluted piece; matching the cuts correctly.
Roll all colors of fondant very thin. Use party hat cutter to cut light pink, dark pink and lime green hats. Using poly blade, cut away hat brims and tops. Attach mismatched pieces to center of cookies using piping gel. Decorate hats using stripes cut from different colors or use tiny circle cutter to make contrasting color polka dots.

Cutie Halloween Cookies

Cutie Halloween Cookies

Cutie Halloween Cookies


Supplies used:

Autumn Carpenter’s Halloween Cutie Cupcake Cutter Set
Autumn Carpenter’s Mini Accent Cutter Set
perfection strips
purple rolled fondant
white rolled fondant
lime green rolled fondant
orange rolled fondant
black rolled fondant
brown rolled fondant
piping gel
sharp paring knife
black royal icing
tip #1
parchment bags
pastry brush
round cookie cutter

Instructions:

Roll purple and lime green fondant thin using black perfection strips. Cut circles to fit cookies and attach to cookie using piping gel. Use large circle accent cutter to cut pieces out of each cookie, replacing purple circles with the green ones.

Bat: Roll black, white and orange fondant very thin. Cut out bats. Use the two smallest round accent cutters to cut the eyes from white fondant. Use paring knife to cut small triangles for the teeth and to draw a mouth. Attach all pieces to bat using piping gel. Using the smallest circle accent cutter, cut the dots for the bats stomach and attach with piping gel. Attach bat to center of cookie. Roll tiny pieces of black fondant into balls for the eyeballs and attach with piping gel.

Pumpkin: Roll orange, brown, white and green fondant very thin. Cut pumpkins from orange fondant. Cut pumpkins from brown fondant then cut the stem of the pumpkin off and attach to orange pumpkin with piping gel. Use the mini accent cutter shaped like a football to cut green leaves to attach to stem. Cut eyes using the two smallest round accent cutters and cut the mouth using an oval shaped cutter out of the white fondant; attach all pieces with piping gel. Attach pumpkin to center of cookie. Roll tiny pieces of black fondant into balls for the eyeballs and attach with piping gel.

Skull: Roll white and black fondant very thin. Cut skull from white fondant and attach to center of cookie using piping gel. Use the two larger circle accent cutters to cut the eyes from black fondant; attach to skull with piping gel. Roll tiny pieces of green fondant into balls for the eyeballs and attach with piping gel. Use black royal icing to pipe the nose and mouth.

Baby Girl Cookies

Baby Girl Cookies

Baby Girl Cookies

Supplies used:
baby face cookie cutters
bottle cookie cutters
flower cookie cutters
bird cookie cutters
electric pink food color
electric orange food color
electric yellow food color
orange food color
blue food color
flesh food color
brown food color
tip #1

Icing required: Prepare run sugar icing in the following colors: light pink, dark pink, light green, dark green, light yellow, yellow,
flesh, orange, white, and brown. Prepare royal icing in light pink, dark pink, light green, dark green, yellow, and dark brown.

Baby Face Cookies: Outline and fill the baby face cookies with flesh-color run sugar, leaving the space for the hair and hair band
uniced. Allow the flesh color to set completely. Pipe the head band with pink or green run sugar. Allow the
band to set completely. Pipe the hair, the ears, and a flower on the band. Then pipe two dots using brown run sugar for the eyes,
an oval for the nose using flesh run sugar, and the smile using dark brown royal icing.

Bottle Cookies: Outline and fill the cylinder of the bottle with white run sugar. Allow to set completely. Pipe lines with yellow
royal icing. Outline and fill the ring of the nipple with pink or green run sugar. Allow to set completely. Add lines with pink
royal icing. Outline and fill the bottle nipple with flesh run sugar.

Bird Cookies: Outline and fill the bird head and body with light pink, light green, or light yellow run sugar. Allow to
set completely. Outline and fill the bird’s wings using the darker shade of the icing used for the bird. Pipe contrasting colors
of dots on the wing using run sugar. Add a beak and the feet with orange run sugar. Pipe a dot of brown run sugar for the eye.

Flower Cookies: Outline and fill the petals of the flowers in pink, yellow,or green run sugar icing. Allow to set completely. Using
tip #1, create a plaid design by piping fine lines of contrasting colors of royal icing. Outline and fill the
center of the flower with pink, yellow, or green run sugar. Pipe contrasting colors of dots using run sugar.

Print a copy of this project.

Flocked Roses and Leaves

LSAC-S3C30-018Supplies used:
round cookie cutter
leaf cookie cutter
electric pink food color
electric green food color
white sanding sugar
Icing required: Prepare run sugar icing in the following colors: light pink, pink, dark pink, green.

Instructions:
Custom color the sugars to coordinate with the four colors of run sugar. Outline and fill the cookies with run sugar. Allow the iced cookie to set completely. When the background color is completely set, pipe the details of the cookies with run sugar. Immediately sprinkle with sanding sugar to flock.

This project was taken from my book “The Complete Photo Guide to Cookie Decorating”.

Print a copy of this project.

Birds In A Cage Cookies

LSAC-S3C30-017Supplies used:
bird cookie cutter
comma cutters
turquoise rolled fondant
pink rolled fondant
lime green rolled fondant
orange rolled fondant
vintage print edible frosting sheet
black sugar pearls

Instructions:
Bake and cool bird cookies on stick. Make the bird fondant piece using either solid colors of rolled fondant or printed rolled fondant using edible frosting sheets. Insert a ball tool to emboss an indentation for the eye. Remove the beak and the feet. Add a dot of piping gel for the eye. Insert a black sugar pearl. Cut the back feathers with a comma cutter using either using either solid colors of rolled fondant or printed rolled fondant using edible frosting sheets. Attach to the bird with piping gel. Make the beak and feet using orange rolled fondant. Cut with the same cutter used in baking. Attach to the bird with piping gel. Cut a piece of styrofoam to fit the birdhouse. Spray the styrofoam black. Arrange the cookies in the bird house.

This project was taken from my book “The Complete Photo Guide to Cookie Decorating”.

Print a copy of this project.

Retro Flower Cookies

LSAC-S3C30-016Supplies used:
flower cookie cutter
round cookie cutter
buttercream icing
cherry pink food color
orange food color
super red food color
electric blue food color
electric green food color
tip #2A
tip #3
carnival edible frosting sheet
Icing required: Prepare buttercream icing in the following colors: orange, pink, green, blue, red.

Instructions:
Fill a pastry bag fitted with tip #2A with colored buttercream icing. Pipe flower petals. Using a round cookie cutter for the pattern of the center of the cookie, cut the frosting sheet . Fill a pastry bag fitted with tip #2A with white buttercream icing. Pipe a dot in the center of the flower. Place the cut edible image on the piped buttercream dot. Fill a pastry bag fitted with tip #3 with colored buttercream icing. Pipe small dots around the center of the flower.

This project was taken from my book “The Complete Photo Guide to Cookie Decorating”.

Print a copy of this project.

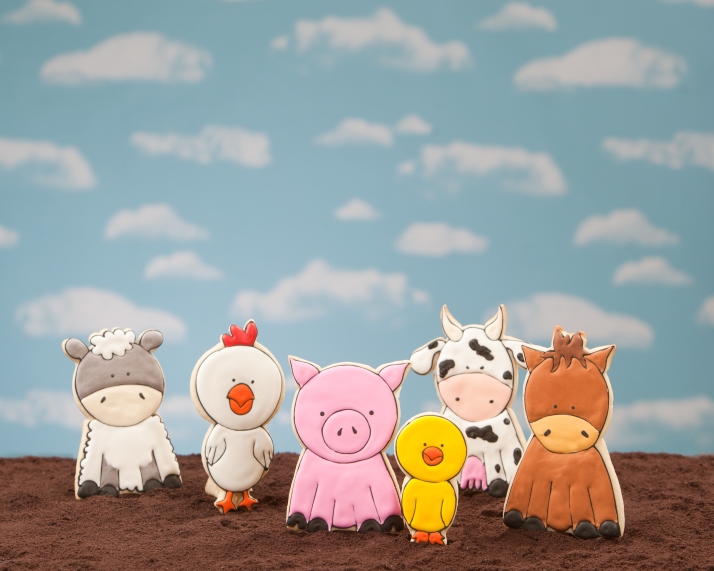
Standing Farm Animal Cookies

LSAC-S3C30-015Supplies used:
round cookie cutter
oval cookie cutter
owl cookie cutter
gingerbread girl cookie cutter
aspic cookie cutters
crown cookie cutter
pink food color
black food color
yellow food color
orange food color
brown food color
ivory food color
red food color
Icing required: Prepare run sugar icing in the following colors: white, light pink, grey, ivory, black, red, orange, yellow, light brown, brown, and dark brown. Prepare white royal icing with a stiff peak.

Special Baking Instructions: Cut the sheep using the bottom dress from gingerbread girl cookie cutter for the body. Cut the sheep’s face using a round cutter. Use teardrop cutters for the ears. Use a scallop aspic cutter for the curly hair. Cut the pig using the bottom dress from gingerbread girl cookie cutter for his body. Cut the pig’s face using a round cutter. Use teardrop cutters for the ears. Cut the horse using the bottom dress from gingerbread girl cookie cutter for his body. Cut the horse’s face using an oval cutter. Use teardrop cutters for the ears. Cut the mane using a six sided star cutter. Cut the cow using the bottom dress from gingerbread girl cookie cutter for his body. Cut the cow’s face using an oval cutter. Use teardrop cutters for the ears and horns. Cut the chick using the bottom half of an owl cookie cutter for his body. Cut the chick’s face using a round cutter. Cut the rooster using the bottom half of an owl cookie cutter for his body. Cut the rooster’s face using a round cutter. Add a comb using teardrop shapes. Cut triangles to fit each of the baked cookies to create standing cookies.

Instructions:
Sheep: Outline the sheep and all the details with black run sugar icing. Allow the outline to set. Fill in the face and ears with grey run sugar. Add two small dots using black run sugar for the eyes. Fill in the front legs with grey run sugar. Immediately fill in the body with white run sugar. Fill in the top of the sheep’s head with white run sugar. Fill in the feet with black run sugar. Fill in the nose with ivory run sugar. Pipe two small teardrops using black run sugar for the nostrils.
Rooster: Outline the rooster and all the details with black run sugar icing. Allow the outline to set. Fill in the face and body with white run sugar. Add two small dots using black run sugar for the eyes. Fill in the legs and beak with orange run sugar. Fill in the comb with red run sugar.
Pig: Outline the pig and all the details with black run sugar icing. Allow the outline to set. Fill in the face, nose, and body with pink run sugar. Add two small dots using black run sugar for the eyes. Pipe two small teardrops using black run sugar for the nostrils. Fill in the feet with black run sugar.
Chick: Outline the chick and all the details with black run sugar icing. Allow the outline to set. Fill in the face and body with yellow run sugar. Add two small dots using black run sugar for the eyes. Fill in the feet and beak with orange run sugar.
Cow: Outline the cow and all the details with black run sugar icing. Allow the outline to set. Fill in the face and ears with white run sugar. Add two small dots using black run sugar for the eyes. Pipe spots using black run sugar. Fill in the horns using ivory run sugar.Fill in the nose with ivory run sugar. Add two dots for the nostrils. Fill in the teat with pink run sugar. Fill in the feet with black run sugar. Fill in the body with white run sugar. Pipe spots using black run sugar.
Horse: Outline the horse and all the details with black run sugar icing. Allow the outline to set. Fill in the face, ears, and body with brown run sugar. Add two small dots using black run sugar for the eyes. Fill in the nose with light brown run sugar. Pipe two small teardrops using black run sugar for the nostrils. Fill in the feet with black run sugar. Fill in the mane using dark brown run sugar.

Making the Cookies Stand: Allow the decorated cookies to dry completely. Pipe a strip of royal icing in the center of the back of the cookie. Attach the cut triangles. Stand the animals and allow the royal icing to dry.

This project was taken from my book “The Complete Photo Guide to Cookie Decorating”.

Print a copy of this project.